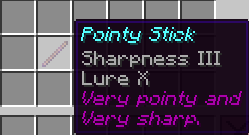
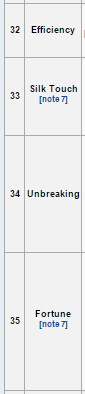
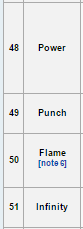
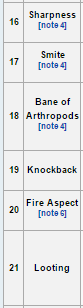
Ever seen those items with enchantments on? Ever wanted to do that? Well, actually it's pretty easy once you understand the tags. Some tags you could add to an item are the display, the enchantments or the lore, the possibilities are endless. In this tutorial we're showing you how to use a command block to /give an item with display names, lore and enchantments. Because with these items, it automatically takes anything after the type as a tag, all you need to do is type /give @p (item) [amount] [DV] {tag:{...}} Remember it's best to put the command into a command block because the amount of characters you can enter is greater. So an example would be: /give @p stick 1 0 {display:{Name:"Pointy Stick"}} This will give you one stick, with the name Pointy Stick. The DV which is usually left blank is set to 0, because there are no other types of sticks to get. Next we will add a lore. /give @p stick 1 0 {display:{Name:"Pointy Stick",Lore:["Very pointy and","Very sharp."]}} This will give a stick with the name, as before, but it will also have a lore Very pointy and (next line) Very sharp. We put the lore in the display tag, and with "Name". The [] after lore mean that multiple tags can be included, allowing us to have multiple lines of lore. Next, the enchantments. /give @p stick 1 0 {display:{Name:"Pointy Stick",Lore:["Very pointy and","Very sharp."]},ench:[{id:16,lvl:3},{id:62,lvl:10}]} Again we use the same name and lore, but also have a level 3 sharpness and level 10 'Lure'. You can put any enchantments on them and the enchantments can go up to about 3000 before extreme lag occurs. Notice the ench: tag is inside the tags range, but outside the "Name" tag. The comma before it separates it from the "display" tag, and lets you include another one. After ench: we use another [] to include multiple enchantments. They are all separated by commas.
0 Comments
Leave a Reply. |